


The EHD team is back and ready to accept our awards for the Closet Org Olympics. This challenge truly tested all of us but we are better and our closets are more organized for it. To recap, our fearless leader Jess came up with the idea to have us each organize our closets for under $150 in 4 weeks. It turns out we all needed this challenge to kickstart our organizational skills and break the clutter spell. Now our day of reckoning has come so if you are curious how we each fared in this challenge, you are in the right place. I’ll start.
Ryann

I am awarding myself the status of partial success. I didn’t magically procure more closet space (weird????) and my “afters” are not the most satisfying, but I did my best to capitalize the space I do have. That was indeed the goal but I don’t feel 100% satisfied (and I did kind of cheat –more on that below). But let’s rewind and start from the beginning.
Before


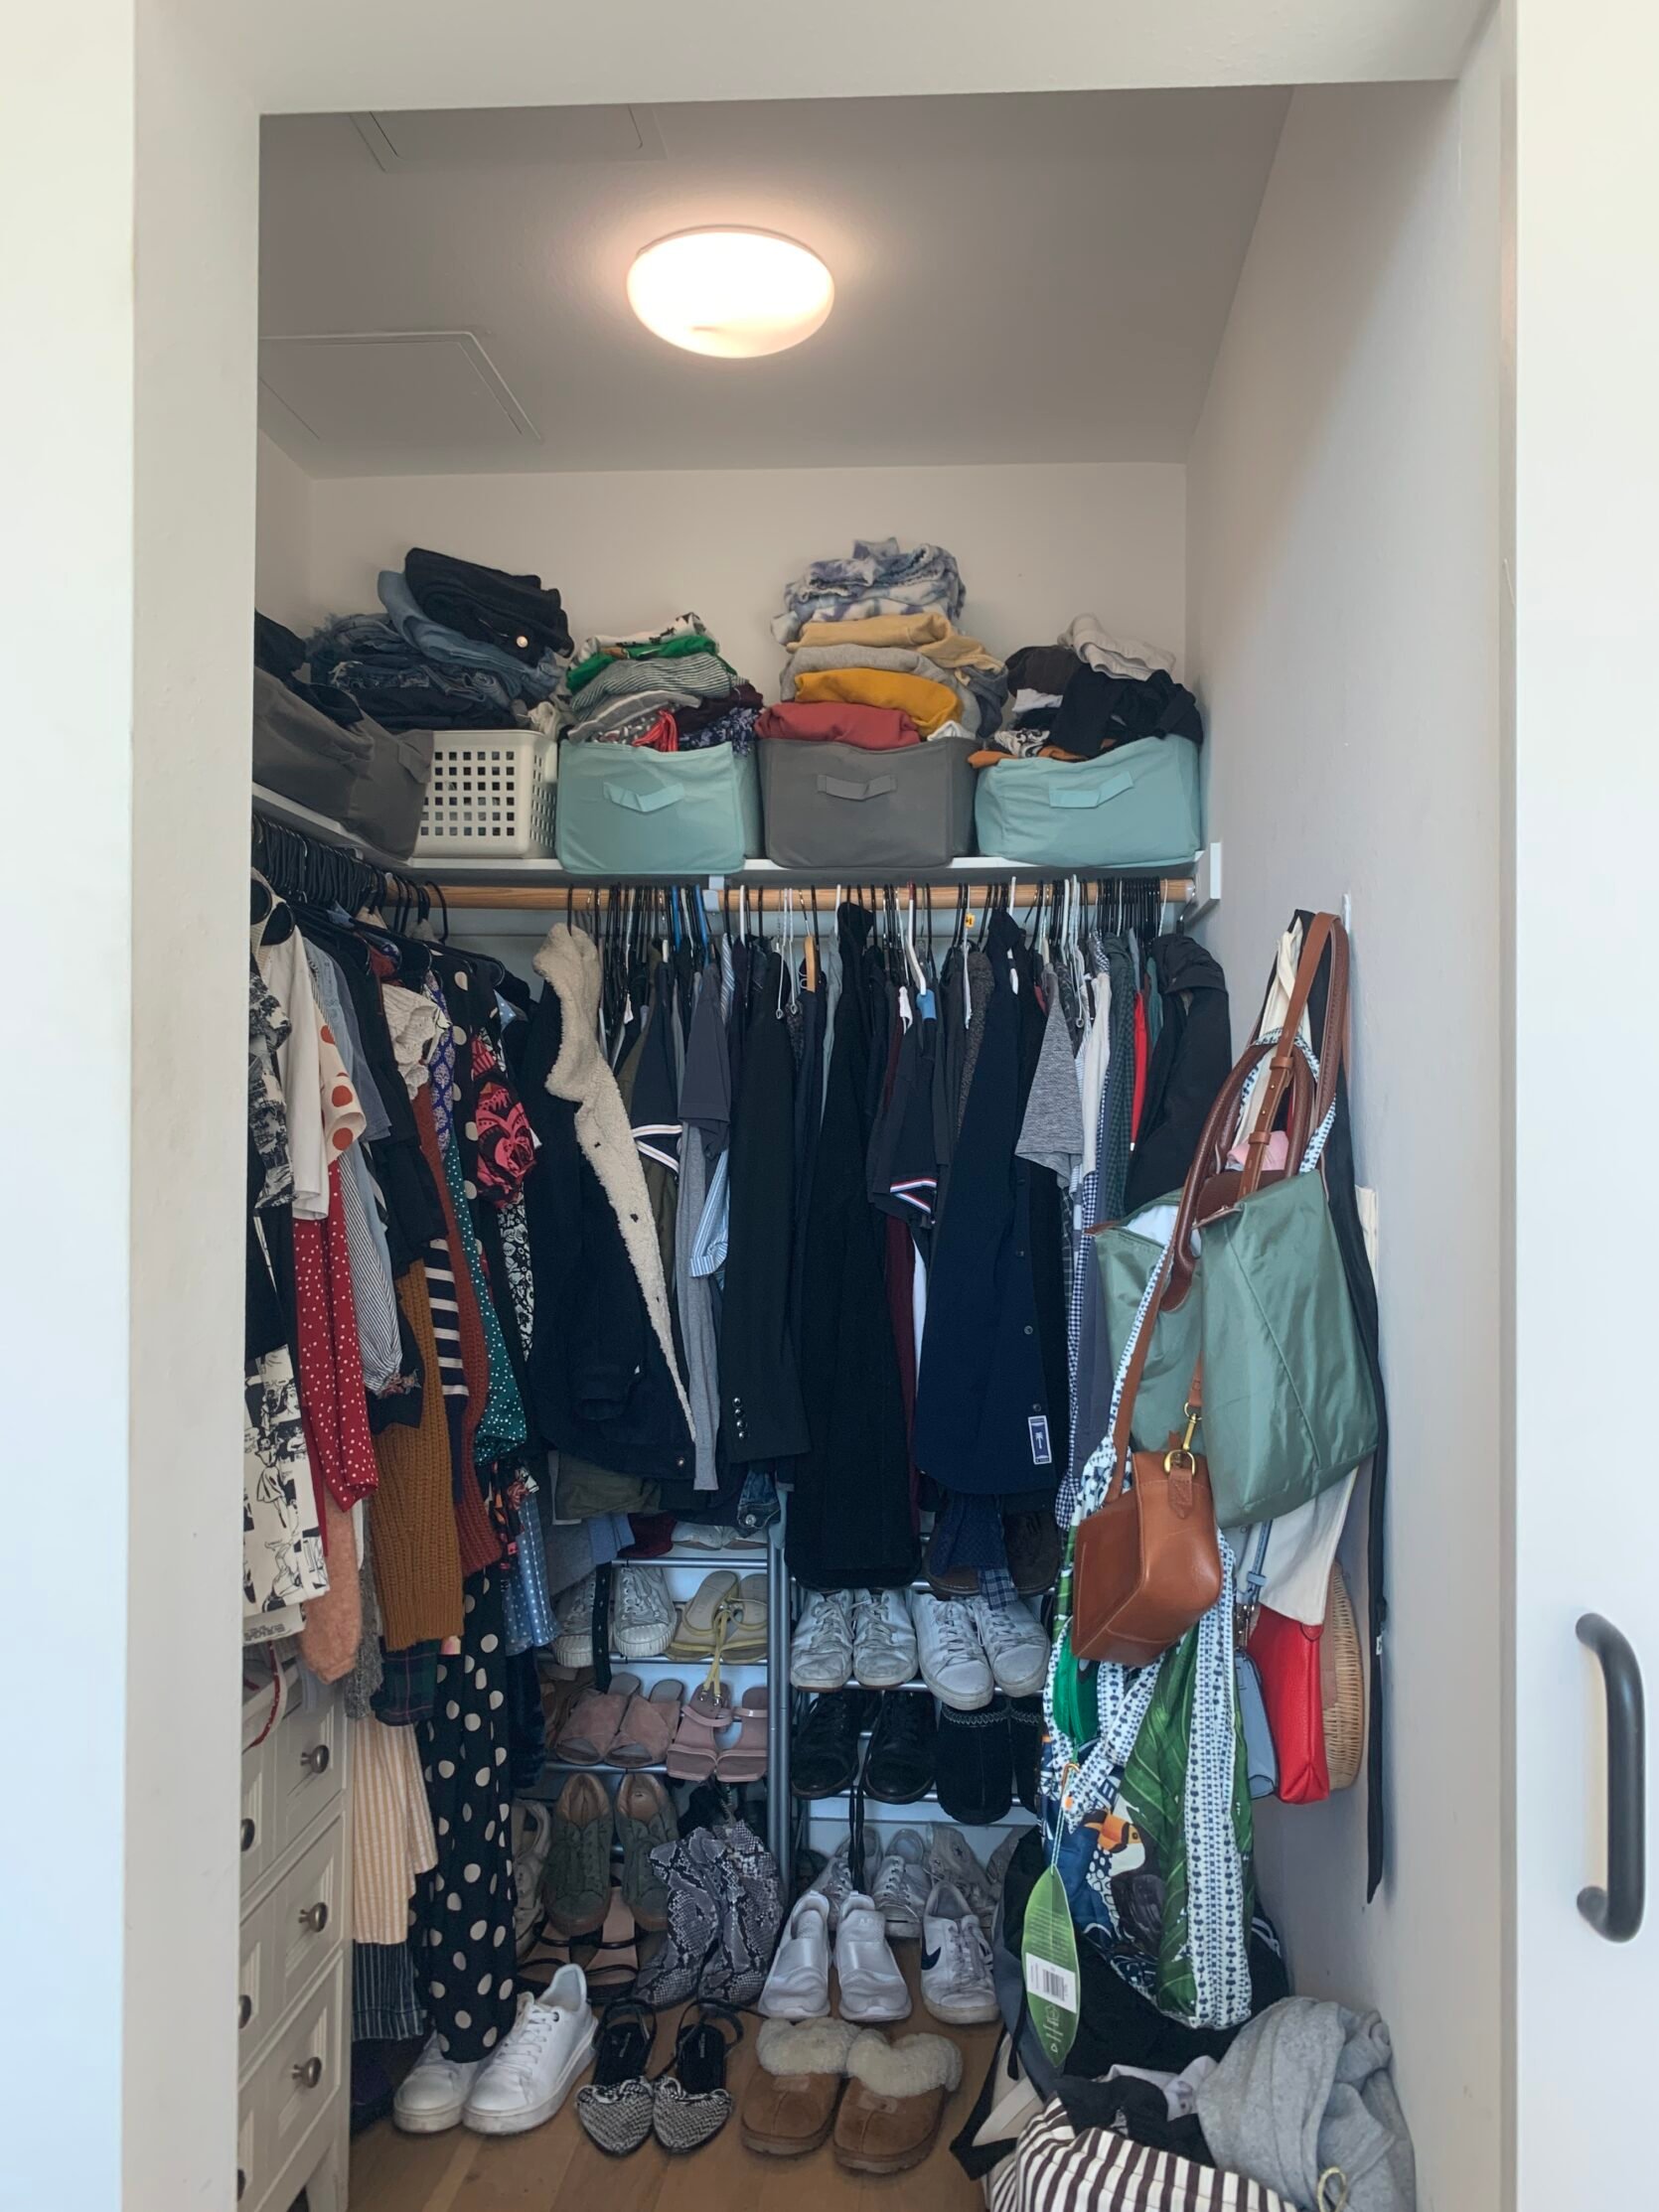
Here is our dark and ominous before. To reiterate the pain points as if they aren’t plain to see, the top shelf storage was a dumping ground for sweatshirts, blankets, and old puzzles. The space wasn’t used efficiently and with a tiny closet, every inch counts.

This is a never-before-seen picture of the closet floor. The secret is out! Our closet floor is a mess and before this challenge, I hadn’t seen the back of our closet in a while. Oh, the closet shame is real.

Finally, we have this clothing rack because our small closet doesn’t come close to cutting it. It’s the first thing you see when you walk into our room and like I said in the intro post, it could be better. My main goal was to clean this area up so at least we have less of an eyesore to look at every day.
Now let’s see how I did:
After


I am pretty happy with this. I bought the fabric bins for sweatshirt storage and fit as many as possible I used these compression bags. I was able to fit 8 sweatshirts in each bin which is great but there is a catch. Obviously, they are not the most accessible so I had to choose what sweatshirts and other articles of clothing we want to keep but don’t wear as often. It’s not the best system in the world but it is the best system for the closet situation we have.
I bought the open stackable clear bins last minute as advised by Mallory who might as well be the spokesperson for these bins. They are expensive at $22 but they are the best solution for sweaters and long sleeve shirts. They are open in the front so everything is accessible and easy to grab and put back away.

So here’s where I cheated a bit. Rocky and I have big winter coats that took up too much space but we live in LA so we rarely need them. We don’t want to give them away so the solution I came up with is to store them at my parent’s house. They live 30 minutes away so anytime we are going somewhere cold we can easily pick them up. And if we do get a blizzard in LA I guess we will just have to live with this decision.
Once I removed the huge winter coats, clearing up the closet floor became a much easier task. I actually discovered blankets and shoes I had forgotten about as a treat for my hard work!! With this area, I really had to move things around and try my best to store things efficiently. Some items I was able to move into our dresser as that space opened up. I moved blankets into one of our bathroom cabinets (the struggle is real) and any lingering clothing I folded and put into this underbed storage bag. I felt like I was playing real-life Tetris for like a day and a half but the result is that my closet is at least 5 x more organized.

This is probably my biggest success story. I needed to maximize shoe storage and on a whim bought this shoe rack. It ended up fitting perfectly on top of the clothing rack, creating a 2 tier shoe storage solution. This helped alleviate a lot of the shoe clutter. Next, I bought these hangers so visually the rack appears more uniform and organized. We try to hang our everyday sweaters, pants, and jackets here so they are easily accessible and that way the rack doesn’t get overcrowded. I also replaced our laundry basket with a collapsable one that is a little more pleasing to the eye. Finally, I ended up folding and stacking my jeans on the side shelf which freed up an entire drawer in my dresser.
So did I fulfill the challenge?? I’d say somewhat but the truth is in the numbers:
Storage Compression Bag – $20
Shoe Rack – $32
Underbed Storage – $9
Fabric Bin x 2 – $20
Hangers – $22
Laundry Basket – $18
Clear Sweater Bins x 2 – $44
GRAND TOTAL: $165


Not the most satisfying before and afters this blog has seen but it’s a start. Perhaps I need a true professional to help me but at least our storage is functioning a little better for our everyday needs. Hey, Rome wasn’t built in a day, right?
Now let’s move on to the rest of the team, but first: a fun video 
Jess

I highly recommend forcing your friends and coworkers into an organizing challenge. I am SO much happier now that my closet is organized, functions WAY better, and is simply nicer to look at. Let’s get into the process and details…
Before


As a refresh, this was the before. Not terrible but not as functional as I wanted. The “floor bin” was a messy bummer but housed items I needed every day (like underwear). I also had random things like lampshades that didn’t need to be in this closet and bins that didn’t really work well for what I needed (they were repurposed in another closet). Anyway, enough with the past and let me show you how it looks now:)
After


TADA! New year, muuuuch better closet. I did a little Marie Kondo action and took everything off those shelves (top and sides) to decide what needed to stay, what should go in a different closet, and what should be donated. I tried to be smart and cutthroat with myself about what I actually used and wanted to keep.
You might also notice that the shoe situation is a lot better. That’s where most of my “cutthroat-ness” came into play. It felt great to purge and one thing I decided to do for myself was take the shoes I was keeping that needed to be cleaned, reheeled, or otherwise fixed up to my local shoe repair shop. It was only three pairs with the added purchase of a shoe cleaner to save money cleaning other pairs myself. I think this is such a good reminder to take care of/repair the things we already own before they are unfixable. Especially shoes since we can wear them down to the point of no return. A new heel sole is a lot cheaper and more sustainable than a new pair.

If you were wondering where all those books came from, the answer is the cardboard boxes in the before photos. Much better right? Also, those hats were taking up PRIME real estate on that first shelf, so I just took some nails I had and hung those puppies up on the wall. I also LOVE those striped bins. They feel really solid for fabric bins and I decided to choose the smaller and non-lidded option (there are multiple options in this pattern) so that they are really easy to grab off and put back on.

I can’t tell you what this cubby system has meant to my life and back. Way less bending over:) The actual cubbies were easy to build and crazy affordable. Also, how cute are those round bins?! Are they maximizing the full extent of the cubby space? No. But I love how they look, mixing up those shapes, which to me was more important and still fit my needs. Lastly, the cubby cabinet was the perfect size/height to put my yoga mat and block on top with enough space to fit my suitcase next to it. Extremely satisfying.
Here’s how much this all cost:
Striped Fabric Bin x 6 – $78
Plastic Bin x 2 – $20
Round Bin x 4 – $40
Cubbie Storage – $28
GRAND TOTAL: $166 (oops! $16 over)
I did go a little over but I love everything I got so I’m ok with my rule-breaking behavior. I also thought it would be fun to show you what’s in these secret bins:

And here are a couple more before and afters because it’s fun to see. It’s not going to be featured in any magazines but all I wanted was a nicer and more organized space. Check and check.


Mallory

There was great success, but with a huge catch (and I apologize in advance)…
Before


After


Original Plan:
Laundry Hamper – $60
Hanging Shoe Storage – $20
Bins x 8 – $70
GRAND TOTAL: $150
Perfectly on budget, so well planned out. Everything was going to be great right? WRONG. SO WRONG. But we’ll get there…let me explain. So, the original plan was to get some new bins that were tall enough to cover the stack of clothes that truly went to the ceiling and bothered me so much but here’s what that ended up looking like:

First off, they didn’t fix the clothes stacked to the ceiling/over the bin problem, and second WE HAD NO IDEA WHAT WAS IN THERE. Like it was just an abyss of clothes in each bin that would immediately get unfolded and wadded up and thrown around…I thought about labeling the bins, but it wouldn’t solve the problem where all of our stuff at the bottom of the bin would just never get worn bc we had no idea what was down there. It could’ve been anything. Plus, the bins were so tall (12 inches high) and were at the top of our closet already so we couldn’t even reach them. And we needed so many that they were shoved shoulder-to-shoulder and it was unspeakably hard to grab them and take them down/put them back up. Then Chase (my boyfriend) turned one of them on its side so he could actually see and reach for his clothes (understandably) and it got me thinking:


Maybe we could find some bins that open out to the side so we can access them?? I would have done shelf dividers, but I wanted to use my vertical space and be able to stack bins on top of each other (for example, light denim and darker denim stacked on top of each other, and not side by side in order save space in our closet) But what about the problem of the stack being too tall and us being not able to grab the stuff out from the bottom/middle of the stack?? Then I found EXACTLY what I was looking for via Pinterest:
WHAT ARE THESE MAGICAL BINS??? I HAD TO KNOW. They’re from The Container Store (of course) and they’re not cheap. I repeat NOT CHEAP. I looked at this and thought “oh these are perfect” then looked at the price tag and I was like “oh there’s no way” so I scoured the internet for hours. HOURS I TELL YOU. I think I must have dedicated 6 hours to looking for bins before I just said screw it, what if I just find a coupon??? A $26 off coupon and my mental sanity was enough for me to finally add them to cart.
Before Before New Bins

After New Bins

Now if you didn’t click on that bin link and figure out the price by now, I’ll drop the number. Each bin is $21.99 and I needed at least 8 to hold our clothes, so the grand total (with coupon) was $149 for the bins. Now a part of me is still mad I spent $149 on closet bins and therefore went drastically over budget (I mean the bins are the whole budget, I know) but I could literally find no other option that had the right dimensions & stackability for what we needed.
Now what we really NEED is a big dresser, like you guys addressed in the comments of the last post, but there’s no room for one in our studio apartment, so I made the decision to invest in nice bins since this would be serving as our dresser for as long as we live here. It had to be AS functional as possible. So, now that you know I went massively over budget due to some dumb bins (that actually work great though and solved a lot of our problems) here is the final price breakdown:
So Here’s What Actually Happened:
Laundry Hamper – $60
Hanging Shoe Storage – $20
Bins x 8 – $70 (then returned half of them) – $35
Bin Pivot/Money Dump: 4 Pack Stacking Sweater Bins x 2 – $174 (and then I used a coupon so -$26) – $149
GRAND TOTAL: $264 (BIG OOPS. I AM SORRY TO BOTH MYSELF AND THE READERS HERE THAT MY WHOLE BUDGET WENT TO SOME BINS)
Seriously though, if anyone has a version of these bins for cheaper (and not a shelf divider or a pantry size) please comment them below because it was a struggle & I’d love to help others find this kind of thing at a more affordable price. Okay moving on to the other problems I finally fixed (and for actually very cheap)!!!
The Shoe Problem – SOLVED
I have to give a HUGE shoutout to commenter, Ijeoma who gave me the idea to mount some of my everyday shoes on the wall. This has helped keep them off the ground in such a big way! Plus now it’s so much easier to just grab what we need and go. 10/10 love it, plus the over-the-door/wall mount shoe rack was only $20 so it was a VERY easy solution. Also a big shoutout to commenter, Allison who gave me the challenge of pairing down to only my matching black hangers – challenge accepted!! I ended up donating a bunch of clothes and shoes and I am SO happy to have less things. Now as a reminder here’s what our shoe situation looked like before:
And here’s what it looks like now!

Also, you might remember, all of my shoes were in this little hiding spot in the corner of the closet…well let’s take a look at where we’re at now:
No More Secret Messy Shoe Hiding Spot – Solved


Here’s the dealey-o. The shoe rack on the wall only holds 18 pairs of shoes (which is certainly not enough for 2 people) and it also only holds tennis shoes & sandals. AKA our more ‘everyday’ shoe items. SO WHERE THE HECK DO BOOTS AND HEELS GO? My answer: on a separate shoe rack in the back corner of the closet You might remember, I originally had 2 shoe racks side by side on the ground back here, but once we put the shoe rack up on the wall and the hamper in the back I had an extra one I didn’t know what to do with. I ended up putting one shoe rack behind the other for the ‘hardly ever worn shoes I can’t get rid of (aka fancy heels).’ It ended up working out perfectly because there’s room if I A. ever buy new pairs of shoes and B. it ended up lining up perfectly with the hamper. This leads me to my next exciting solution:
The Hamper And Bag Storage Problem – Solved
So you might remember originally, we had a hook situation that just wasn’t working out. It looked a little something like this:

Originally we had 2 hooks side by side: one for the hamper and one for bags, but the hamper got too heavy and the hook fell out of the wall so our laundry’s been living on the floor ever since (really cool, I know). We were in need of a hamper but just didn’t have the space for a big one, so we ended up doing some layout changes and I found a pull out hamper that I put in the back of the closet like so:

I love this hamper SO MUCH. The functionality of this works so much better and for only $60 it beats the heck out of doing a custom pull-out. I love this hamper for 3 huge reasons: 1. It has separate places for lights and darks so we don’t have to separate them out anymore 2. They pull out so you don’t have to see the top of the gross laundry and 3. They have a little shelf on top that was the perfect size for our weekender/duffle bags that we’ve had a hard time figuring out where to store. I AM IN LOVE. Oh and if you’re curious, yes the pull-out bags do pull all the way out so you can pick them up and bring them over to the washer/dryer which is awesome. This was probably some of the best $$ spent. It has made our lives SO much easier.
I know what you’re wondering…what happened to the rest of the bags???

See that lil bin in the corner? Those are all my bags!! Truly I rarely use these bags and they were renting some PRECIOUS real estate they could no longer pay. Well, they got evicted and we moved them to the back (which I am so happy about). Originally, I thought I would need to build a shelf for them but for cost reasons & the fact that I had so much more space once I got the clear stacking bins from the container store, this ended up being the perfect spot for them.
Emily

I’ll be honest that coming up with an organizational system for our rental closet is probably one of my lower priorities in life right now. Sure, the mess is annoying but I mostly wear athleisure (peloton + writing from home + site visits + dog walking = no outfits) so I’m not as annoyed with it as most people would be. I was more ashamed to show you:) So honestly I didn’t spend too much time on the front end ‘designing’ or coming up with a strategy. I’m sure there are ways this could have been done better, but the 2 hours of brain space that I could have spent on it was spent on much more pressing is
Before

I know that I’ve published myself in a bikini on the internet but this is far more embarrassing. No system = chaos. It’s a big closet, too so there is a decent amount of potential.


FYI I had shipped most of my ‘city’ clothes and shoes from LA directly up here (not to Lake Arrowhead) so I recently unpacked them and was appalled at the sheer amount of clothes and shoes I have right now. I did a quick purge (my sister is begging for hand-me-downs) and it helped.

Apparently, this is where Charlie keeps the soccer ball. Sure. So two days ago I went to Target and did some quick purchasing.
After

HOW SATISFYING. This is now Brian’s side (rod-speaking) with his T-shirts and sweaters in the hanging canvas shelf and his button-downs on the left. We have a dresser in our bedroom that is mostly his, so this is just a small amount of his clothes. I could certainly have folded his stuff better, but I simply didn’t feel like it. The jeans up top are the ones that I like enough to keep even though they don’t currently fit me. I figure I’ll give myself till fall to see if I can get into them again and if not, SEE YA.

I bought a couple more of those wood bins which I strangely love. They are half bin/half shelf, so they stack, are easily accessible, and keep the mess inside. I use these for my workout clothes (which I wear all the time because I also walk the dogs 2 hours a day). So from top left we have workout shorts, pajama sets, workout pants, and workout T-shirts. P.S. I think I’m the only person who bought a Peloton in 2022 (post-pandemic sales have plummeted) after using my neighbors since September and loving it. I’m trying out almost every instructor to do a post about ‘my favorite instructors with SPECIFIC class recommendations’ (i.e. if I’m in a bad mood I know I can do ________ and the music makes me so happy, etc).
ALSO, I stuffed my tall boots with rolled-up magazines and it changed my life.

I got an over-the-door shoe holder to get 1/2 of those “city shoes” off the ground. Such a quick/fast solution that took away my shoe shame.


The biggest difference is obviously the sweater storage in the hanging canvas shelves. I LOVE THESE and I’m so glad that I didn’t buy a piece of garbage dresser (fun design fact – cheap dressers are the one piece of furniture that I really try not to buy because they simply don’t hold up long-term). I scoured Craigslist and FB marketplace for a couple of weeks to see if I could find a small dresser for in here, but I couldn’t bring myself to buy anything ugly or expensive unless I saw myself using it at the farm. So these shelves are GREAT because I know that I can use them in a kids’, guest, or linen closet. Also, I organized by color which is ALWAYS satisfying.


I am VERY glad that the girls forced me to do this closet challenge. All it took was one stop (Target) for the hanging shelves, bins, shoe holder, and those black velvet hangers. It gave me an excuse to listen to a podcast (I started Broken Harts – OOF) and I now carry around less closet shame. I probably went over the budget, but who’s counting? (answer: Ryann)
Large Stackable Wood Bins x 4 – $80
Over The Door Shoe Organizer – $17
Hanging Fabric Storage Organizer x 4 – $48
GRAND TOTAL: $145


Ok, that’s all! Are you inspired? Got any more fun ideas? Would you like more of these “real-life” budget org challenges? Let’s chat.
Opening Image Credit: Photo by Sara Ligorria-Tramp | From: A Bedroom & Closet Reveal with Target’s Made by Design Line
The post EHD $150 Budget Closet Org Challenge Reveals – Did We Succeed?? appeared first on Emily Henderson.